Banner

Banner
Showing posts with label Challenge2013. Show all posts

Monday, March 11, 2013

Experiment with Bottlecaps and glue


So I have collected two jars of bottle caps and I wanted to make something with them.
My idea was dried flower with a resin on top of the scene, inside the bottle cap.
But before I went out and create a whole bunch of bottle caps I wanted to find a replacement for resin.
Apparently resin is stinky, expensive and a chemical. Not something I want to deal with in the winter.


So I choose:


Tacky Glue
Hot Glue
Modge Podge


Created a nice scene with my dried flowers and filled three bottle caps with the glues


Then I waited 4 DAYS


I think I used too much glue and the modge podge had air bubbles, but I think I could use those two glues if I was willing to wait a week for them to dry.
The Super glue was clear before it dried but really its just gross, so thats a definite no.

Come back in a couple weeks to see what I do with my non resin bottle caps

Thursday, March 07, 2013

Practicing my Embroidery

So this past week was midterms and it really messed up my blogging schedule (as well as my previous excuse last week). But never fear, there will be another post that follows this one sooner than later :)

In my awesome book of needlework I saw these two images

 and I decided to take a piece of fabric and practice my embroidery so this is what I came up with


I used simple back stitch, fill-in stitch and flowed the pattern on the fabric to give it some depth.

I'm happy and it will be on my wall as soon as I find my extra frame.

Friday, March 01, 2013

Late post: Chore Chart

So I realize that this post is a week late, but this doesn't mean I didn't do my craft!
I've just been having trouble with internet and uploading photos.

This week project was a Chore Chart

The project is for my roommates (4 boys and 1 other girl) and I to keep our apartment tidy with equal contribution. I wanted it to be self managed and no need for one person to be in charge of switching papers, writing new months or resetting anything. Searching online didn't help, but a conversation with a co-worker did.

This is my first idea, not implemented for the fact that it needed a manager.

All the items are important but Daily, Weekly and Monthly wouldn't have worked with us. So after talking to a co-worker and hearing how she rotated Chores I came up with this!

CHORE CHART

Supplies:
Magnetic board (I used my roommates calendar board from target we weren't using)
Paper
Magnets
Strong tape (I used duck tape when I got the ok from the roommates)
Pins (I used safety pins)
Paper (I used beige and black)
Ruler
Pens/Markers
Scissors


First I covered the board with paper, outlined the boxes free handed the instructions and that made the base
 Then I cut 2"x2" squares black and beige and wrote the important chores on the black and the optional but necessary chores on the beige.

The squares were temporally taped with scotch but after everyone ok'd the chart I used black duck tape (not shown)

The optional chores where taped to safety pins and stuck to the pin area which was covered in black paper.

Its been working, which is the most important part :)

Sunday, February 10, 2013

Reusable Hot Cup Sleeves and Tea Wallet

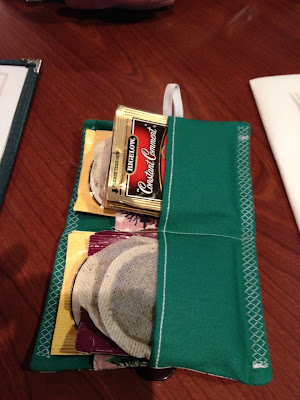
Last week was my mother and eldest sisters birthdays, because both of them love hot drinks I decided to make them reusable cup sleeves and for my mom (the tea drinker) a tea wallet.

The tutorials that I used are linked here
Cup Sleeve and Tea Wallet

But as stated before, I don't follow tutorials. I'm inspired by them :)

So I started off with creating my pattern.


I used a paper sleeve and added 1/2in seam around the outside.


 Next was cutting out my fabric. I have been saving these flower patterned fabric for my sister for years, and finally I USED THEM!!

The fabric is thick so I opted to not use a interfacing.

My mom said that while it was nice to feel the warmth from the drink, I should probably use an interfacing next time.
So if I make these again, I'd make them with two options. "Feel the warmth" and "Be protected" (patten pending j/k)


After cutting the fabric you place the right sides together (pin) and add the elastic bit folded and placed inside the two pieces (see right).
I liked starting on the opposite end from the elastic piece at a corner. Sew towards the elastic band, and finish at the corner next to where I started. This left a small hole for my to pull the fabric through (using the elastic loop). Shown to the left.


I finished by ironing the sleeve flat with attention to the hole. Once the seam was ironed flat, I sewed around the outside edge to keep the project all together.

The button I placed 2 1/2in - 3in from the outer edge on the front. 

Of course most of the fun is selecting the best button 

My Tea Wallet project, of course I forgot to take many pictures.

First I cut the fabric, three squares 5x8 and one 4x8 (I didn't have enough fabric to follow the directions to a T)

I ironed the two pocket pieces with a 1/4in seam. Sewed it before placing it on the green inner fabric (see the tutorial for what I did next)


I think it turned out fabulously :)


Finished product

My mom putting it to good use

Birthday Girls!


I added a applique flower to the flower sleeves. There just weren't enough flowers


You can see the added flower better here (one the brown one)


Of course I had to make myself one too (on the right)
It was fun adding stitches from my new machine (see it on the edges?)

Monday, February 04, 2013

Soda tab bracelets

So these bracelets were made back in December. But are presented as this weeks project because the crafts I made are gifts for my mom and sister who've birthdays this weekend.
I mean, I couldn't really blog about the crafts before the presents arrived and were opened
.  
So, here are the Soda tab bracelets I made for my two younger sisters. I found the flare pins way back in July, but I decided that the buttons were a little weak as a present
The inspiration came from this image
But I had difficulty figuring out how to weave the ribbon, but I found this blog that helped. Here's the exact image I based the weaving off of.

The few quirks that I added were
- The loop at the beginning is the hole the flare go through
- I sewed the two ribbons together at the end of the project. Leaving a 1 1/2in-2in portion
- The flare is pinned on and can be moved to fit the wearers style or wrist size

B

Monday, January 28, 2013

Sweater boots

So UrbanThreads has a sweater boot tutorial that seemed like a lot of fun (click here)
Flats and sweater arms, I'm so using those gold rings later

But, I didn't have ultimate success :(

I followed the steps


Gathering my materials


Fitting the sweaters arms to my leg
Pinned to fit the leg, ready for sewing


Sewing the seams and gluing the shoes to the sweater.


Glued. Starting at the sole was the best method
I needed to trim the sweater off the flat at the top
The pre-cuff product


and then creating my cuff, I had fun putting the different fabrics and adding some machine embroidery. 
An issue develop while adding the cuff to the boot top.


The sweater I chose is ribbed and stretches more the the tutorial sweater did, so the top of my boot doesn't look right :(

This is going to take longer to figure out but I will eventually figure out a way to make the top look appealing to me. When that happens I will post a picture.
Its too wet in Chicago to wear these yet anyway.....

Thursday, January 17, 2013

Revamped iPhone case

This fall I traded in my malfunctioning blackberry and joined the Iphone owners club.
I was really excited to get a case for my phone but wasn't willing to pay Apples prices. So when I found this case at a Ohio mall and was ecstatic.

Unfortunately, the case didn't hold up and it wasn't too long before the lovely red birds started to rubbed off.

Since the case was still functional, just no longer pretty I decided to use it for this weeks craft.

Supplies
Mod Podge
sewing scissors
paper scissors
paint brush
perminate pen
tape
fun fabric

I cut my fabric to fit my phone. In this case my back square (blue) was 5in by 3in and the red was cut in 1/4in stripes


Next I taped the fabric to the back of the case so I could mark where I needed to cut out earphone holes and such were. See the arrows.


After that it was a matter of painting the mod podge on to the case and placing the fabric.
I wanted to start at the camera whole and match edges from there. That was the most important area to me


Once everything was even sans corners, I cut a square out of the fabric and spread the fabric flat. Adding extra glue.


Doing the same for the top portion, but with more care. I ended up with this.
Yes, I'm happy with my new case :)
- b

Sunday, January 13, 2013

Simple Cord bag - Pinterest inspiration

Life has been really hectic these past few weeks. My school schedule starts tomorrow and I've yet to be home for 5days. Holiday traveling is really fun, but I need to get back into my routine.
Funny story, my craft for this week was left in Ohio so it didn't get finished on the bus ride home. So instead I will tell you about my gift to my eldest sister for Christmas.

I totally saw this on pinterest. Since I had been meaning to try one of the multiple picture tutorials that are clearly from a Chinese website I thought Christmas was as good as time as any.


I didn't have all the materials, like the zipper or the felt, so I added a flap to the pattern and used an iron on interface to stiffen the fabric.
I free handed this pattern (based off the pin tutorial)
and used this to make the red bag in the photo.

I was pretty happy with the first attempt, but I need to fix the pattern and try again with my new machine before I post the how to and pattern :)
I would like to have straighter seams (impossible with my old sewing machine) and a zipper closure.


- B